Shabby

Friday, March 21, 2014

Easter/Paris Themed ATCs

This month over at Creating the Crafty Life, Misty is hosting an ATC swap. For those who don't know, ATCs are tiny works of art that are always swapped and never sold. They're like trading cards for grow ups. :-)

We had a choice of doing either a Paris theme or a traditional Easter theme using the beautiful pastel colors of spring. I couldn't make up my mind, so I melded both themes together and this is the result.

Voila! Easter in Paris! I found the egg shaped ATC cards through an Etsy seller. I edged the sides with Dusty Concord Distress Ink, then covered the front and back with the pretty Kirby Teesdale paper from Paper Studio (Hobby Lobby).  

The flowers in the back are from a beautiful trim I found at Goodwill last year (10 yards for $7.99!!!). The glittery Eiffel Tower is a Jolee sticker.

I found the springy Victorian ladies online, resized them, and printed them off on some pearlized card stock. The sentiment, "Joyeuses Pasques" (Happy Easter) was also printed on the same card stock. The purple flowers are from an online seller (who's name escapes me at the moment) and the yellow roses are from the $1.50 spot at Michael's. I used an EK Success punch for the green branches.

This is my first set of ATCs and I think I'm hooked. It's a great project if you're looking to satisfy your urge to make something but are a little short on time. :-) 

Blessings!
Millie


Friday, March 7, 2014

G45 Easter Bonnet

"In your Easter bonnet, with all the frills upon it, 
You'll be the grandest lady in the Easter parade."


This time of year, I start daydreaming of spring. This particular year, I started a lot earlier. I love to stroll through the little girl's departments at the mall to enjoy this season's crop of pretty, frilly dresses. One thing I've noticed, however, is that "Easter bonnets" are no longer to be found or at least difficult to find. 


So this year, I decided to add my own little bonnet to our Easter decorations. 


For this project, I used several Graphic 45 
collections. I love how the papers
easily mix and match.


The images on the top and bottom of the hat are from 
the new Sweet Sentiments line, the polka dot paper for 
the hat itself are from Little Darlings, and the 
yellow check bow is made from Secret Garden. 


I trimmed the bottom of the hat with some crepe
paper and pretty lace given to me by a friend.

This was a great addition to our decorations this year and I have another hat under construction. :-)

Blessings,
Melissa

Tuesday, February 11, 2014

CCL Key to My Heart Holiday Challenge

CCL (Creating the Crafty Life), is having a Valentine challenge! The challenge was to create a project using a heart shape and it had to be dimensional. 

A few weeks ago, I found two of these heart shaped plaques at Goodwill for .99 cents each:

They were cute, in an 80-ish kind of way, 
but I wanted to dress them up a little so....

 ....this was the end result. :-)
THE DETAILS: I reached for my G45 Place in Time 
February Cut Aparts again for this project . 
It's embellished with flowers, bling, doilies, and lace
from my stash. It stands about 8" tall and can 
sit on the easel as shown below or be hung
from a peg. The pretty pink bauble at the top
was another Goodwill find. 


Valentine's Day is only a few days away and I need to get busy on some masculine/boy themed Valentine's for my sweeties and I still have a couple of projects to complete for the Artful Creation Contest! But it was nice to take a break and create this very girly project for my favorite holiday!

Blessings!
Millie

Wednesday, February 5, 2014

CCL ARTFUL CREATION CONTEST: Valentine Tussie Mussie (Project #5)

For my 5th project entry, I decided to create a Valentine tussie mussie. I used the following items from Lucky's box of supplies:

White lace
Silver mesh
12 x 12 and 6 x 6 sheets of grey cardstock
Pearls and rhinestones
Silver metallic pleated trim
White satin pleated trim
"PARIS" bling
Black mesh bling
Crystal acrylic chandelier drop
Large deep red velvet rose


I started  by printing a black pattern on the grey card stock
using a large damask stamp. 
Next I formed the tussie mussie. 
I inserted layers of the white lace, silver mesh, and
some black lace I had on hand. 
I added the pretty deep red rose, a smaller off white 
paper rose, and a grey paper flower I created using
the smaller sheet of card stock and a flower punch. 

I created the stickpin with some beads I had on hand
and some of the "PARIS" bling Lucky included
in the kit. Behind it is a small white feather spray
I found in Hobby Lobby's wedding section.
the Eiffel Tower in the back was cut from some 
Paris themed wrapping paper I hand. 

For the cone, I die cut a doily and heart using my
dies from Cottage Cutz. 
I adhered three rhinestones to the heart for 
added bling and hung the acrylic chandelier
drop to the bottom. 
The red, white, and grey paper roses are from my stash. 
Behind them is another white feather spray 
from Hobby Lobby.

I used the black bling as a dangle and also 
wrapped it around the bottom of the cone. 
Below that, I wrapped the silver and white pleated trims. 
Lastly, I cut the silver mesh into strips and attached
it to the bottom of the cone. 

This was way off my usual style. I'm not a big fan of the Paris theme but I like how this turned out. 

Blessings,
Millie


Tuesday, January 28, 2014

CCL ARTFUL CREATION CONTEST: Flower Fairy (Project #4)

Still have some materials from Lucky's box so I created a 4th project for the CCL Artful Creation Contest. I used the following items:

6x6 floral scrapbook paper
12x12 purple scrapbook paper
12x12 pastel stripe scrapbook paper
8.5x11 purple and mint green self adhesive sheets
blank white card stock trifold card
pink cotton lace trim
white satin trim
silver mesh
sheer pink ribbon
pink holographic circle stickers
self adhesive pink pearls
plastic flower buttons
flat back pearls
hot pink pearls
rhinestone bling


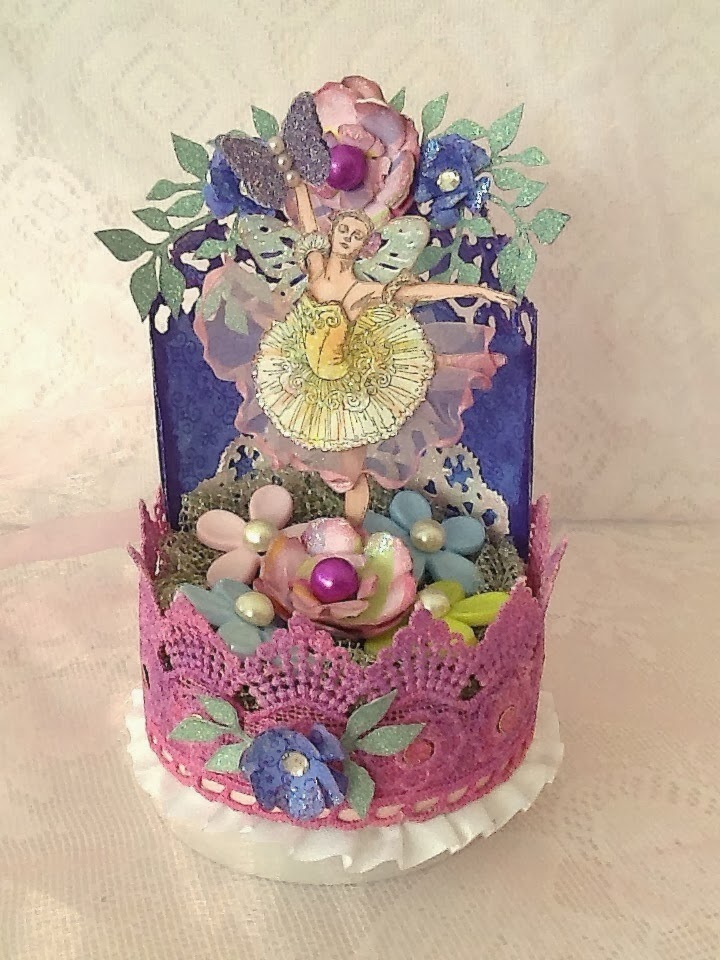
And this is the project!

I started by creating a base out of a couple of empty 
ribbon spools I had on hand. 
I die cut one of the pieces of the trifold card using the 
Tattered Doily die by Tim Holtz. This created
the back wall. I covered it using the pretty purple 
scrapbook paper from the box. 
I die cut a 2nd doily and attached it to the base
of the wall just to add some interest.

I die cut the leaves from the green glitter paper
The paper flowers were die cut using the Tattered Florals
die by Tim Holtz. I the purple paper for the smaller ones
and the pastel stripe paper for the two larger ones.

I stamped the fairy using a stamp from Graphic 45's 
Nutcracker Sweet collection. I stamped her tutu onto
the 6x6 paper and paper pieced it on to the original 
image for dimension. Her skirt is trimmed 
with some sheer pink ribbon from the box.
The butterfly was punched with a 
Martha Stewart punch, using the purple glitter paper. 
I used the tiny pink pearls to create the body of the butterfly. 
Her wings were punched from another 
Martha Stewart butterfly die.

The "grass" she's standing on is the silver mesh from 
the box. I sprayed it with some green Lindy's Starburst. 
She is surrounded by the cute plastic flower buttons 
and another die cut flower. 

I sprayed the pink crochet lace with some pinkish Lindy's to
give it some more depth and shimmer. After that, I wrapped
it around the base to make it look a bit like
a crown for a fairy princess. :-)

I also adhered some of the pink holographic circles to 
the center of each flower on the lace. 
At the bottom of the base, I adhere some white satin pleated 
ribbon that came in the box. 

EVERYTHING was liberally glittered with Stickles! Of course!
Still have some ideas for more projects. Hoping to get to them
before the deadline.

Blessings,
Millie

Sunday, January 19, 2014

CCL ARTFUL CREATION CONTEST: Springtime Layout (Project #3)

This is my 3rd entry for the Artful Creation Contest over at Creating the Crafty Life. Thanks to all of this polar air, I've been spending a lot of time daydreaming about Spring!

Below are most of the items I used from the wonderful box sent by Lucky:

In addition to the items below, I used a cute little wooden dress form 
and a 6"x6" sheet of pretty scrapbook paper she put in the box. 
The silk orchid I used was actually a light green color and 
I also used a white silk lily that was also included in the box.


 This is the result. My little reminder that Spring is on it's way!
I whitewashed a piece of corrugated cardboard and adhered 
the whole piece to it. I've had the vintage photo for a while
and thought she was perfect for the project.
The punchinella in the background was painted white then glittered
with the iridescent glitter we were sent. 
Created the stickpin using some of the beads from the box. 
The metal heart charm was from my stash.
I prepped it with gesso then painted on some 
Lindy's in blues and greens.
The dress form was also whitewashed. I made the skirt using 
the pretty silk lily adhered one of the sheer white flowers, and then 
attached one of the pretty yellow dangling beads.
I think the sheer green ribbon was also from the box 
(can't remember). I adhered another pale yellow gem
and another yellow bead dangle. 
The glittery aqua flower was punched from some of the card stock 
included in the box. The butterflies were also punched
from very light aqua card stock I received as well.

I think that's everything. I have a few more ideas for projects using the remainder of the supplies we were sent so I'll be working on those this week.

Blessings,
Millie

Wednesday, January 15, 2014

CCL ARTFUL CREATION CONTEST: Altered Dress Form (Project #2)

Got knocked off my feet last week by a stomach bug and then lost my creative spark so this took forever to complete. After dismantling it a couple of times (and with some help from my 9 year old and his growing artistic eye) I managed to finally finish this today.

These are the items I used from the box that Lucky sent me:


 And this is the end result. I wanted the dress form to be
functional, so I attached a clip to the top to hold
a small monthly calendar and a few mementos.
The pretty lady in the photo is my mom. She would have
looked smashing in a dress like this! :-)


I gave everything a white wash with some gesso 
just to soften the lines a bit.
This is where my 9 year old helped out.
I originally had this grey pleated skirt on the left side of the dress.
He told me it looked uneven. He was right! :-)


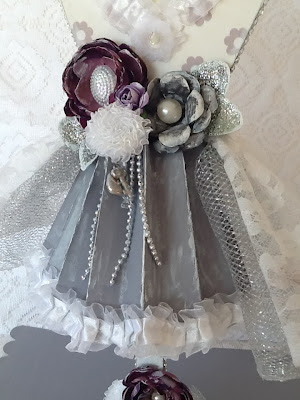
Close up of the skirt. I made the flower with the large
pearl using my flower punch and the brownish
cardstock Lucky sent in the box. 
The rest of the flowerscame from the box.
Hard to see, but the charms dangling from the skirt are a 
purse and a key. The leaves were originally green,
but I used the fine silver glitter to bling them up
a bit and to match the color scheme. 


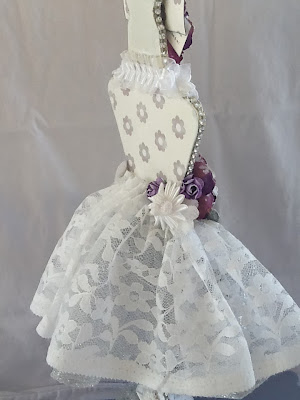
Backside. I ran a stitch through the lace and the silver mesh,
then gathered to give it volume. 

Happy with the way this turned out. Now on to Project #3!!!

Blessings,
Millie