Shabby

Saturday, April 13, 2013

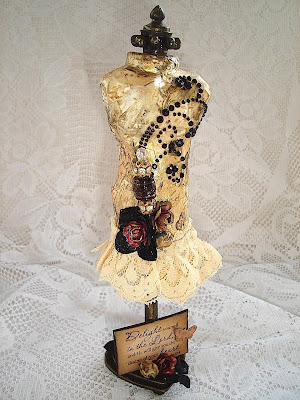
From Garbage to Glamorous: Transformation of the Humble TP Roll

Earth Day is April 22nd, but I thought I'd get a head start and play around with one of the many empty TP rolls I've been hoarding. A few weeks ago, I watched a woman create a dress form using one and I couldn't wait to give it a try.

In between laundry, house (ho hum) work, meal prep, and caring for my sweeties, I managed to whip this up today. I love how it came out!

The dress form stands about 10.5 inches tall. I Mod Podged 
some tissue paper and script paper on the body, 
then dry brushed on some black and metallic gold paint 
to give it a vintage look. 

The cap on top is from an old Christmas ornament. 
The black bling was from my stash, 
and the lace ruffle on the bottom came from an old runner. 
I didn't like the runner but the trim was beautiful!

Everything I used I already had on hand. NO SHOPPING! 
I made the stick pin with some beads I was given and some from 
an awesome Goodwill haul a while back.

Backside. I'm not used to working with these colors 
but I really like the vintage look of this project.

AMEN! I have several scripture stamps and this is one of my favorites. 
Love this verse! This is at the bottom of the front side. 
I took two wooden hearts, in graduating sizes, glued them together, 
then painted them black and gave it a dry brush of metallic gold. 

This is on the bottom of the backside. I used a wooden dowel as the stand. 


This was a lot of fun and I'll probably make more. And since I live in house full of frequent bathroom users, I'm pretty sure my supply of toilet paper rolls will never run out! 

Blessings,
Millie


Wednesday, March 27, 2013

Lindy's Stamp Gang Art to the Eggstreme Contest!

Lindy's is having a contest this month! The challenge was to alter an egg using any of their products. The egg could be made of any material (paper mache, plastic, wood, etc.).

Right now I have a handful of their beautiful glittery Starburst sprays and they all happen to be in some pretty Spring colors so I went to town spraying, spraying, spraying and painting, painting, painting! The colors I used were: Ramblin' Rose Pink, Magnolia Magenta Gold, Baby Blue Eyes, and Edelweiss Moss Green (don't you just love the names????):


First, I started out with a large plastic egg, similar to the one below:

Mine came with a cute Little Mermaid stamper. :-)

I decided to use only the back half of the egg to create an Easter diorama and this is how it turned out:

Voila! My entry for the contest! 
I found the little girl and the dog and chick graphics online. 
I colored her Easter eggs and the flowers in her basket by hand using the Starburst stains. 
I also used Stickles glitter glue quite liberally throughout this project. 

The pink, green, and blue flowers, the lace on the bottom, the green butterflies 
and the grass were all painted with the Starburst stains. 
I painted the background first with gesso, then with the Baby Blue and Edelweiss Moss stains. 
The metal butterfly was washed with gesso also then painted with all four stains I have on hand. 
The cheesecloth on the side was sprayed with all the stains.


This is the backside. I got the purple color on the large roses by combining Baby Blue Eyes and Magnolia Magenta Gold. Really like the color that resulted. 


Found the perfect Spring poem for this project online. 

I decoupaged the backside with strips of newspaper, brushed on some gesso, 
then used all four Starbursts stains. 

You can find all their great products here: http://www.lindystampgang.com

This was such a fun project. HAPPY EASTER ALL!!!!

Millie

Saturday, March 23, 2013

G45 National Craft Month Challenge Entry 2: Easter Dress

Every year about this time, I find myself strolling through the girls departments at the mall, admiring the fresh crop of frilly Spring dresses and the pretty accessories necessary to complete the perfect Easter outfit.

I've been blessed with two beautiful boys but once in a while, I imagine what it would be like to have a daughter to share in the joys of all things girly.

This project was born out of one of those moments.

This is my 2nd entry in G45's National Craft Month Challenge for March. Again, I used the very springy SECRET GARDEN papers.

My little girl would wear a pretty shade of purple!

...and have a pretty necklace just like Mommy's!..

....and a great big fluffy bow in the back.


Finally used the cute little Martha Stewart butterfly punch I got for my birthday!

Every little girl needs matching accessories!

Bright and shiny patent leather shoes and a big straw hat!


A matching purse to hold her little Bible and other essentials. 
Off to church and then to the big Easter egg hunt!!! :-)

Easter Blessings!
Millie

Sunday, March 17, 2013

G45 National Craft Month Challenge

As if I needed a reason, March happens to be National Craft Month and, of course, Graphic 45 is having a National Craft Month Challenge!

I finally finished this project over the weekend. As it happened, Saturday was very cold and even a little snowy so working on a SPRING project was very therapeutic.

For this project, I used Graphic 45's Secret Garden collection. It's full of beautiful Spring yellows, greens, blues, purples, and pinks and perfect for the Spring/Easter season.

This started out as a humble little box I found on clearance just after Christmas last year. Eventually the box will hold a matching mini album that will contain Easter photos of my boys.

I've always wanted a beautiful garden gazebo surrounded by flowers. I'll have to settle for this for now.

I made the gazebo out of chipboard using several cuts of Tim Holtz's birdcage die. I gave it a coat of white gesso for a little texture. Since Spring flowers are my favorites, I already had a bunch on hand to decorate the box. 

I would SO love to be sitting in there right now!!!! I gave the flowers a light brush of gesso too and add some Stickles here and there for some glitter. I made the little girl's garden swing using the same birdcage die. 

Quote from the book. Love, love, love the greens and yellows in this collection!


Left side of the box. A few months ago, I scored a HUGE bag of lace trims at Goodwill for mere pennies and I tucked some of it here and there on this piece. 

Right side. 

Backside. I did A LOT of fussy cutting of teeny tiny flowers from the paper but it was worth for the dimension it gives to this project. 

Top of the gazebo. 

Thursday, February 14, 2013

Valentine Projects 2013

Wasn't able to complete too many projects this year, but I enjoyed the ones I did. First up is a card I made for another crafty friend of mine. I used Graphic 45's beautiful LADIES' DIARY papers to create this very easy easel card.


Next, I created some special packaging for some of my husband's Valentine treats. Again I used G45's LADIES' DIARY. 


It's become a family tradition to give him Andes for 
pretty much every holiday on the calendar! LOL


Valentines for my 12 year old and 8 year old were a little more challenging this year. Both boys are really into the classic Godzilla movies so, on a whim, I decided to google ''Godzilla Valentines''. And guess what I found??? 


Who knew Godzilla was a popular theme for Valentine's Day????

For my 8 year old....

For my 12 year old!


Lastly, I made another Valentine mini album using a design by Gloria Stengel at Scraps of Life. She's one of my current favorite designers and her project tutorials are super easy to follow. For this project, I used the lovely Valentine collection from Authentique which is called, of course, LOVELY.

This mini measures 6" x 6".

 It's constructed of just a few sheets of cardstock, pretty papers, and 
some embellishments I already had on hand.


Pretty stickpin I made. 

Although it's small, there are several fold outs and plenty of room for photos!

 Another fold out.....

....and another. Lots and lots of room! Thanks, Gloria!


You can find her tutorial here: 

gloriascraps.blogspot.com/2012/12/graphic-45-and-scrapbook-adhesives-by.html

Still have a couple of small projects in the works.!!!

HAPPY VALENTINE'S DAY!
Millie

Friday, January 18, 2013

Promises to Remember: An Altered Art Project

Every year, on New Year's Eve, our church has a wonderful tradition. We enjoy a time of food and fellowship, then head over to the sanctuary to ring in the New Year in prayer and thanksgiving. Toward the end of the service, we're encouraged to write a few things down that we'd like to leave behind. We take those things, dump them in a garbage can, then chose Bible verses from a basket to hold on to and meditate on throughout the new year.

This year, I decided to create some altered art that incorporated the verses I chose. They will be displayed in the places I spend the most time in, to be a constant reminder to me of God's faithfulness and unfailing love.

Below is the first piece I created. It measures approximately 7.50" x 8.25".

I used K & Company's Que Sera Sera papers to collage the background. 
After I tore the papers, I distressed the edges with Tim Holtz's Distress Ink in Vintage Photo.
I also used some vintage floral art I found on the Internet and stamped the 
metallic gold dots on the left. I also edged the board with the same metallic gold ink. 

The verse and the music paper behind it are collaged onto a 
wooden heart I had in my stash. 
The lace in the back and the pretty bee charm are from Hobby Lobby.  
I sprayed the pink roses with Lindy's Stamp Gang to give them a bit of sparkle.
The tiny white roses are from Michael's $1.50 bin.

The Old Testament verse was printed on my computer and distressed with Vintage Photo. 

" 'Though the mountains be shaken and the hills be removed, yet My unfailing love for you
will not be shaken nor My covenant of peace be removed.' says the LORD
who has compassion on you." Isaiah 54:10

I'll be making 3 more of these hopefully in the next couple of weeks. 

Blessings,
Millie

Wednesday, January 16, 2013

Graphic 45 January Challenge 2013

Hi All!

Finally finishing up my entry for Graphic 45's January Challenge! This month, the challenge was to create something from the beautiful Place in Time collection.

To see more of this collection, head over to their blog: http://g45papers.typepad.com/graphic45/2012/09/graphic-45-sneak-peeks-a-place-in-time.html

You can create anything wish. Layouts, cards, etc. I love doing three dimensional projects so I came up with this: 

Front side. Most of the paper is from the Place in Time collection but I also used some of their Birdsong and a tiny bit of A Ladies Diary. 

Close up of the bottom half. I love the old fashioned honeycomb paper Valentine decorations so I tried to created an hourglass in a similar fashion. 

Close up of the top half. I used a lot of the cutouts and stickers from the collection. I made the pretty red and pink flowers using the Tim Holtz Tattered Floral die. Both were sprayed with Lindy's Stamp Gang Starburst mists. Love the colors!

This is the backside. I needed a new calendar and a place to keep cards for birthdays, anniversaries, etc. This is a pretty way for me to remember to send them. :-)

This is the pocket on the bottom. I made the flowers back here too. Right now, it's just holding the extra months for this year. 


This was another fun project and I love this paper. I still have a lot left so we'll see what I can come up with. Two winners will receive a $50 prize package. They will be chosen randomly and announced in the G45 newsletter on January 31st. TO GOD BE THE GLORY!

Happy Crafting,
M.