Shabby

Sunday, December 27, 2020

Mid-Century Christmas Cottage and Truck

I scored the house on clearance at Hobby Lobby a couple of years ago. It was a little worn looking by the end of the season but I knew I could spruce it up. All the trimmings were items I already had in my stash. I added the star on the roof in memory of my dad who built a huge Christmas star for his house in New York and later in Florida.


The pickup truck is actually an ornament that started out as red. But I really needed it to be pink to match my house so it also got a makeover. I used “Ballet Slipper” chalk paint to redo the truck. After that, I replaced the dark green Christmas tree with a lighter colored one, added a whitewashed wreath sticker to the front, I used a “Merry Christmas” sticker from Prima for the license plate on the back and added snow for a wintery look.


Below are some “Before” photos. I love how they turned out! I could so live in that house and drive that truck! LOL

MERRY CHRISTMAS AND HAPPY NEW YEAR!
Melissa

Friday, April 26, 2019

Springtime Articulated Paper Doll

"The day the LORD created hope 
was probably the same day He created Spring."
Bernard Williams

Hi Friends! I had so much fun entering the challenge over at the Frilly and Funkie Challenge Blog back a few months ago that I decided to enter again. Their theme for this week is "Spring is in Full Bloom" .

For this project, I decided to make an articulated paper doll. As a child, I loved creating my own dolls out of discarded gift boxes. I still have several of them! For this beauty, I used papers from Craft Consortium's "Tell the Bees" collection and a few other random sheets of pattern paper I had on hand.

This doll measures about 11" tall from head to toe.  Her bodice was created from some fabric flower trim I found on clearance at Hobby Lobby. The flowers in her hair, on her wrists, and in her gown were all "fussy cut" to add dimension to the piece. I used some pretty vintage lace that was gifted to me years ago by a friend. 

Both her arms and her skirt extend out. Her skirt reveals a Springtime quote. 

In our neck of the woods, Spring truly is exploding with LIFE! 

I hope you enjoyed this project. If you're interested in participating in the challenge, hop on over to the Frilly and Funkie Challenge Blog for more details.

Blessings!
Melissa


Springtime Mini Mini

“Where flowers bloom, so does hope.”
-Lady Bird Johnson

I recently created this quick mini mini as an Easter giveaway for my Facebook friends. The album measures 4.5” high by 5.5” wide and it’s base is made of heavyweight cardstock. I used Pebbles’ Garden Party 6” x 6” paper pad and some Spring themed embellishments  I purchased last year from Target.


Hope you all had a wonderful Easter. So thankful it's finally Spring!!!

Blessings,
Melissa 


Tuesday, March 26, 2019

Gorjuss Easter Decor

“Easter is the only time of the year when it’s safe
to put all your eggs in one basket.”

This year, I decided to add a few new items to our small collection of Easter decorations.

This piece measures about 7” in height. 
I started by stamping and coloring the Gorjuss Girl image
and the Easter basket. Next came the base construction. 
I used all recycled materials that: a coaster, a small 
frosting container and an empty ribbon roll. 

Next came the decorating. Lots of Spring and 
Easter embellishments I’ve purchased at The Dollar Tree 
or on clearance over the last couple of years.

This little cutie was created in only two nights. I think that’s a record for me! Working on a few more projects. Check back soon!

Blessings,
Melissa

Thursday, March 14, 2019

Frilly and Funkie Guest Design Project: Pass the Tissues, Please!

Hi Friends! Thanks so much for stopping by! I'm very thankful to be guest designing today for the Frilly and Funkie Challenge Blog. This week's challenge is being hosted by Sara Emily (aka Sara's Closet) and the theme this round is "Pass the Tissues, Please". Participants are asked to incorporate tissue paper into their vintage or shabby chic projects. More details for the challenge can be found on their blog.

For my project, I decided to alter one of the many cigar boxes I've collected over the years. Inside the box, I've created a simple mini album showcasing some of my favorite flowers from some of my favorite places to visit.


This time of year, I start to pine for the peonies that bloom annually in our backyard so I decided to create a single bloom to figure prominently on top of the box. To make this beautiful flower, I layered a piece of copy paper between two sheets of pink and gold polka dot tissue paper using Mod Podge. While it was drying, I created templates of the individual petals in various sizes. Next, I traced the petals onto the tissue paper and built the flower, one petal at a time. Yup, a little time consuming but the result is a super fluffy peony. Just like the real thing, minus the ants!


Decoupaging the copy paper along with the tissue gave the petals some much needed stability and allowed for molding and shaping them later on. The stamen of the flower was created simply by fringing a long piece of gold tissue paper and rolling it tightly. The leaves were created using  handmade paper I recently found at the craft store. The top of the box is decoupage with a piece of Finnabair's 'Musica' Tissue Paper. I kept the rest of the box fairly plain, stenciling a simple doily and adding a pearl trim, some lace from my stash, and a metal bee embellishment.

Inside the box, I included a small mini album measuring 5.5"H by 6.5"W. For continuity, the album cover is decoupaged with the same tissue paper used on the outside of the box. The cover photo is one of our peonies from last year. The lilacs pictured inside the lid are from a bush I received for Mother's Day from my husband and sons several years ago.


Inside the album, I chose more photos of flowers from our yard and also from some of the beautiful gardens we are privileged to have in our area.  Each page layout also includes lines from a poem entitled "Song of the Flower" by Khalil Gibran. Every page is layered with a mix of tissue paper, cheese cloth, and various embellishments. 


If you're interested in participating in this challenge, head over to the Frilly and Funkie Challenge Blog for all the details. I hope you've been inspired by today's project and I look forward to seeing what you create with your tissue stash!

Blessings,
Melissa


Wednesday, March 13, 2019

St. Patrick's Day Dress Form

"May God give you...for every storm a rainbow,
for every tear a smile, for every care a promise
and a blessing in each trial.
For every problem life sends, a faithful friend to share,
for every sigh a sweet song, and an answer to each prayer."

Greetings lasses (and lads)! It's that time of year where EVERYONE is Irish at least for a day! Despite the fact that I don't have an ounce of Irish in me, I love St. Patrick's Day! This time of year as a child, I always wished I was Irish but I had to be content with the corn beef and cabbage dinner my very Puerto Rican mom would prepare once a year (with arroz on the side---of course). I was secretly jealous of my Irish classmate who knew how to step dance. Today, I enjoy watching the competitions. I really like the music and the energy of the whole experience but what I love are the beautiful dresses that are worn by the competitors. So much detail goes into the making of a dress and the BLING!!! The sparklier the better!

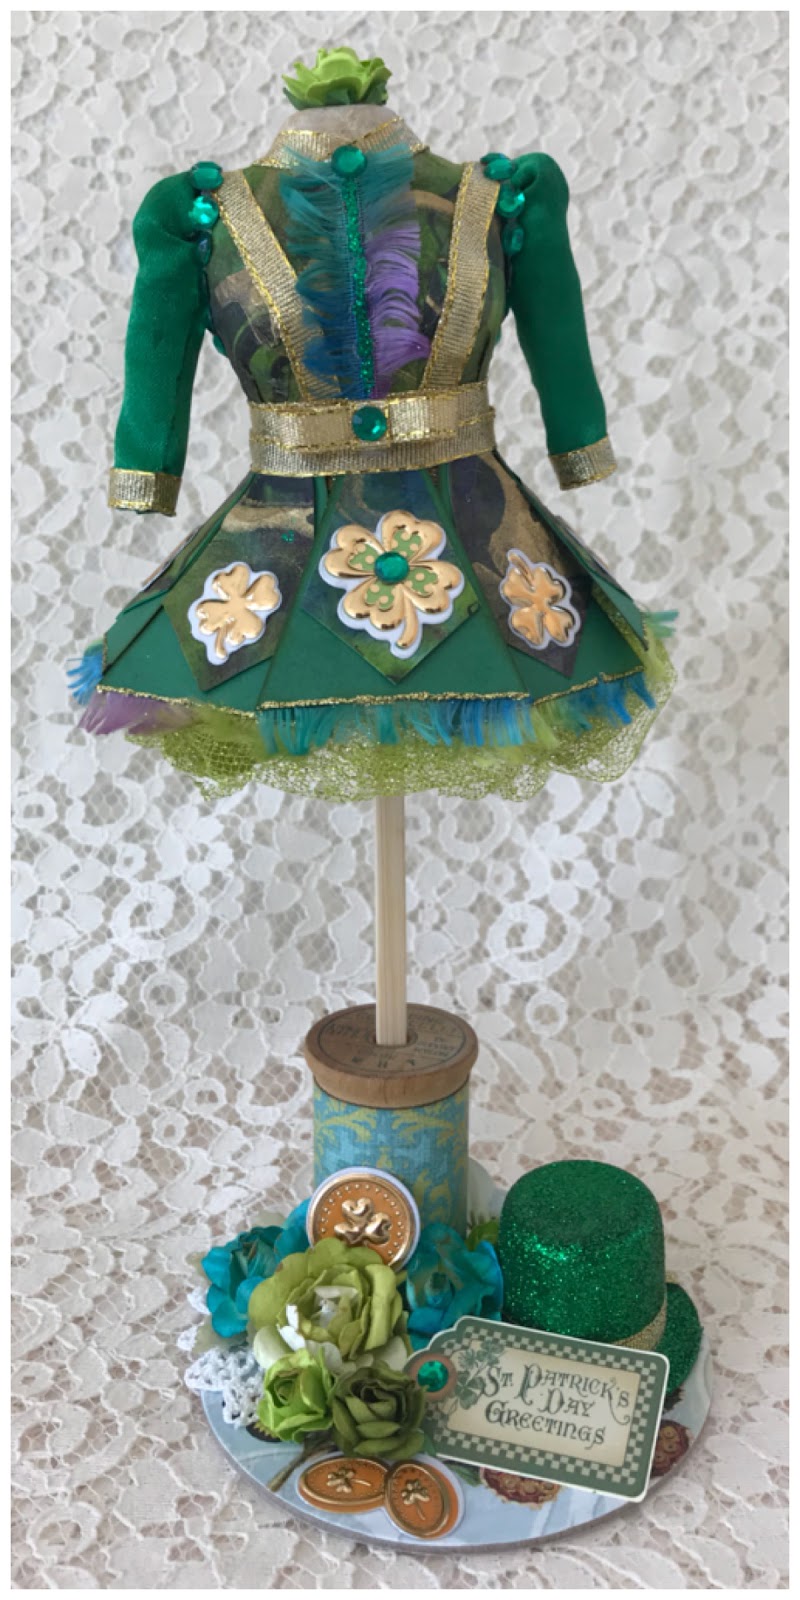
This year, I decided to add to my small St. Pat's display and create my interpretation of an Irish Solo Dress. While researching, I discovered that these lovely dresses come in a HUGE array of colors and designs. They're just beautiful but I kept mine fairly simple. The results are below:


This dress form stands about 10" tall from top to bottom. 
I could have chosen just about any color of the rainbow
but since it's St. Patrick's Day, green was the obvious choice.

Once I got the design down, the dress was fairly 
simple to construct. The satin sleeves were the
most challenging for me. Not being a seamstress,
I had to take a crash course in pattern 
making then do it on a miniature scale!!!

The  bodice of the dress is decoupaged with 
some beautifully marbled handmade paper. 
The shamrocks are stickers from a $1 store.
The under skirt is accented with multi colored fringe 
I found at Goodwill for $1.99. Under that is a 
glittery lime green tulle underskirt.

The base is made from a round coaster. The dress form stands 
on a vintage wooden thread spool and is surrounded
by various St. Patrick's themed colors and 
embellishments. The glitter hat was a pick I
found at AC Moore. The gold coins are $1 store
stickers. The flowers and doily are from my stash.

She fits in nicely with the rest of my decor. 
HAPPY ST. PATRICK'S DAY!

Blessings,
Melissa


Thursday, February 14, 2019

Valentine Projects for 2019

Various Valentine projects I worked on this year.


Shadow box easel card w/drawer.

Valentine treat bag. I used a tutorial 
by Ginger of My Sister’s Scrapper.

Valentine cards for my sisters and nieces.

Z-fold pop up card for my husband.

Lollipop holders for some little friends.

Test tube Valentine treats for my geeky family.
🤓❤️🤓❤️🤓

Really enjoyed working on these this year. Now on to Spring!!!! Thanks for stopping by!

Blessings,
Melissa